
 jQuery Sliding Banner Tutorial
HTML Source Code
The jQuery sliding banner requires the inclusion of two files. The first is called jqslider.js that contains the jQuery slider plug-in and calling code. The second is a CSS style sheet called jqslider.css that contains a number of styles that dictate the layout of the sliding banner.
<head>
  ....
<link rel="stylesheet" type="text/css" href="jqslider/jqslider.css" />
<script type="text/javascript" src="jqslider/jquery.min.js"></script>
<script type="text/javascript" src="jqslider/jqslider.js"></script>
  ....
</head>
Effort has been made with the HTML code to ensure that the page is still presentable even if JavaScript / jQuery is not available. When the jQuery code is not executed, the result is a static banner image with the buttons are hidden using the CSS property visibility : hidden (see below - CSS line 17).
Once the jQuery is executed, the CSS visibility property of the buttons is changed to visible (see below - jQuery line 38) and the link URLs are used for the sliding banner images. The order of the sliding images is affected by the order of the links within the unordered list.
<div id="wsnSlider">
	<img src='images/banner1.jpg' alt='' />
	<ul class="buttons">
		<li><a href="images/banner1.jpg">1</a></li>
		<li><a href="images/banner2.jpg">2</a></li>
		<li><a href="images/banner3.jpg">3</a></li>
		<li><a href="images/banner4.jpg">4</a></li>
	</ul>
</div>
A conscious decision was made to use a class attribute on the unordered list instead of an id attribute to avoid any potential conflicts with other HTML elements and to increase portability. The main container div has an id attribute of wsnSlider, but this is never directly referred to from within the jQuery plug-in. If the id attribute of the container is changed, the calling code (see below - jQuery line 178) and the CSS styles (see below - CSS code) can be updated to reflect this change.
CSS Source Code
The CSS styles required for the sliding banner are provided in a separate file called jqslider.css. Remember that if you change the name of the parent container's id attribute (default is wsnSlider), that you also change the selectors in the CSS file to relect the change.
#wsnSlider {
        width:800px;	/*Default user defined width*/
        height:300px;	/*Deafult user defined height*/
        position:relative;
        overflow:hidden;
        font-family:Arial, Helvetica, sans-serif;
}

#wsnSlider .buttons {
        margin:0 0 3px 0;
        padding:5px;
        list-style:none;
        position:absolute;
        bottom:10px;
        right:10px;
        z-index:200;
        visibility:hidden; /* Hide the buttons */
}

#wsnSlider .buttons li {
        border:2px solid #000;
        width:15px;
        text-align:center;
        float:left;
}

#wsnSlider .buttons li a {
        padding:2px;
        background-color:#fff;
        color:#333;
        display:block;
        font-size:0.8em;
        text-decoration:none;
}

#wsnSlider .buttons li a:hover {
        background-color:#C96;
}

#wsnSlider .buttons li.current a {
        background-color:#aaa;
}
jQuery Source Code
As this is an example of what can be done with jQuery, each line / block of code below has been commented. I am happy to answer any questions that you may have about the jQuery code and will accept any suggestions for improvements.
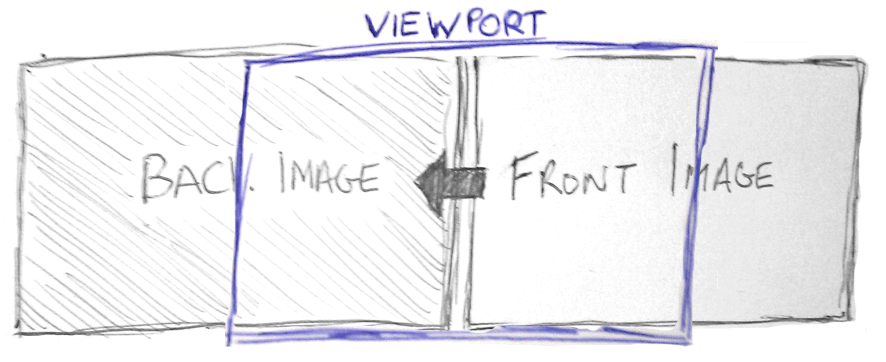 The basic principle behind the jQuery code is to use two images that can be scrolled from right to left across a static viewport. The static viewport is defined by the
 div container that sits around all of the other banner elements. The CSS styles on the div limit the visible size of the container and allow elements that overflow this container to be clipped (hidden).
The two images start off positioned side by side with the front image off to the right of the back image. This means that the front image sits out of view (clipped by the viewport). At the specified interval, both images are animated to their left using the jQuery .animate() method.
Once the images have finished scrolling left, the back image's position is reset which means it now sits behind the front image. The front image's src attribute is then used to replace the back image. Finally, the front image's position can be reset so that it sits off to the right of the back image. The two images are now back in their original starting positions and the next rotation can start.
(function( $ ){

//Define a method called wsnSlider and accept a user defined
//map of settings into a variable called 'options'.
$.fn.wsnSlider = function(options) {

//Supply a set of default values to use if not supplied.
    var defaults = {
            interval: 5000,
            speed: 800,
            slwidth: $(this).width(),
            push : false
      };

    //Merge the supplied options with the plug-in defaults.
    var settings = $.extend({}, defaults, options);

    //Check user supplied wait interval and scroll speed settings.
    //If the speed is slower than the interval, change the speed to
    //match the interval minus 100ms.
    if (settings.interval <= settings.speed) {
        settings.speed = settings.interval - 100;
    }

	//If the push setting is true then set pushsize and slmove
    //values to zero. The images will scale rather than scroll.
    settings.pushsize = (settings.push) ? 0 : 100;
    settings.slmove = (settings.push) ? 0 : settings.slwidth;

//Allow the plug-in to be part of a jQuery chain
this.each(function() {

    //Store the current object reference so that we can pass it
    //to other functions in tact.
	var $this = $(this);

    //Change the visibility of the buttons to visible.
    $('.buttons').css({visibility:"visible"});

    //Add a class called 'current' to the first button
    //item to keep track of the current and next slides.
    $('.buttons li:first').addClass("current");

    //Store the current buttons link href attribute so
    //that we can pass it to other functions.
    var imgSrc = $('.buttons li.current a').attr("href");

    //The next 3 lines of code loop through the button links
    //and create an image tag for each behind the first image.
    //This is done purely to buffer the images on the page to
    //prevent them from not appearing on slower connections.
    $('.buttons li a').each(function (){
    	$this.append("<img src='" + $(this).attr("href") + "'
   												 class='buffer' />");
    });

    //Create a duplicate of the first image to use when
    //sliding the images.
    $this.prepend("<img src='" + imgSrc + "'/>");

    //Position the duplicate image behind the first image.
    $($this).find('img').not('.buffer')
    					.css({ position:"absolute", top:0, left:0 });

    //Use the JavaScript setInterval() function to call the
    //nextSlide() function using the current reference and settings.
    //Let setInterval() call nextSlide repeatedly and use the
    //settings.interval value as the delay.
    rotator = setInterval(function() {nextSlide($this, settings)},
    												settings.interval);

	//Next we need to capture the mouse clicks on the buttons.
    $('.buttons li a').click(function(evt) {

        //Capture and prevent the default link behaviour.
        evt.preventDefault();

		//Stop calling the rotator() function on an interval.
        clearInterval(rotator);

        //Grab the href attribute of the clicked on button.
        //We need this to change to the slide the user clicked on.
        var imgSrc = $(this).attr("href");

        //Find the back image and replace it's src attribute
        //with the clicked button's url
        $($this).find('img').eq(1).attr("src", imgSrc).show(0);

        //Then fade out the front image to make the new image
        //visible. Once it is visible, replace the front image
        //src attribute as well and turn it back on using show().
        $($this).find('img').eq(0).fadeOut(100, function() {
            $($this).find('img').eq(0).attr("src", imgSrc).show(0);
        });

        //Remove the 'current' class from all buttons.
        $('.buttons li.current').removeClass("current");

        //Add the 'current' class to the button the user clicked.
        $(this).parent().addClass("current");

        //Restart the timer on the rotator with default interval.
        //This means that once a user clicks on a button they will
        //wait the default interval time rather than moving on.
        rotator = setInterval(function() {nextSlide($this,
                                      settings)}, settings.interval);
    });

});

//Return the chained object reference to jQuery
return this;
};


//The nextSlide function will animate the sliding images
//using the current object referenece in $this and the
//settings supplied by the user or the default values.
nextSlide = function ($this, settings) {

	//Within the referenced object, find the front image & set it's
    //default starting position off the edge of the viewport.
    //If the push setting is enabled, reduce the objects width to 0%
    //to prepare to scale the size.
    $($this).find('img').eq(1).css({left: settings.slwidth+"px",
    					width:settings.pushsize+"%", height: "100%"});

    //Store the next item after the 'current' item.
    var nextImage = $('.buttons li.current').next();

    //If there is no next item, set the new current item as the
    //first item by adding the 'current' class to the first sibling.
    //If there is a next item, remove the 'current' class
    //and add it to the returned item.
    if (nextImage.length == 0) {
        $('.buttons li.current').removeClass("current")
        					 .siblings(":first").addClass("current");
    } else {
        $('.buttons li.current').removeClass("current")
        					 .next().addClass("current");
    }

	//Store the href attribute of the new current link
    var imgSrc = $('.buttons li.current a').attr("href");

	//Find the front image and change it's src attribute to
    //the stored URL. Then animate the front image from right
    //to left into view. Make sure it's final width is 100%
    //using the speed from settings.
    $($this).find('img').eq(1).attr("src", imgSrc)
    			.animate({left:0, width:"100%"},(settings.speed));

    //Find the back image and animate it from right to left out
    //of view. If the push setting is enabled, scale the image
    //rather than moving it.
    //Once the back image has finished animating, reset it back
    //into position behind the front image with the same src
    //attribute as the front image.
    $($this).find('img').eq(0)
    			.animate({left:'-='+settings.slmove+'px',
                		  width:settings.pushsize+"%",
                          height: "100%"}, settings.speed,
                          function() {
                              $(this).attr("src", imgSrc)
                                     .css({left: 0, width: "100%"});
                         });
};

//End the plug-in code
})( jQuery );


//Call the jQuery plug-in on any item with an
//'id' attribute of 'wsnSlider';
//Some settings can be supplied as a map object:
// interval - delay between slides in milliseconds
// speed - time taken to switch images in milliseconds
// push - true or false to switch push effect on/off
$('document').ready(function () {
	$('#wsnSlider').wsnSlider({interval:5000, speed:800, push:false});
});
jQuery Course Trainer
 Bjorn has been involved in CSS based web design for nearly 20 years and has experience developing web applications in both small and large teams of developers.
Over the past few years he has closely followed the evolving standards for web development and has spent countless hours discussing appropriate markup with web designers in the industry. He has also run training courses on web standards and accessibility which stems from his vast experience with CSS web design.